I am extremely pleased with the outcome of the final garment. If we had more time we would have liked to create a better photo shoot and even a video. As a group we worked very well together. All our designs were included and we all had parts of the project that we did. I have learnt new skills in this project like subtraction cutting and that is something I will definitely use in the future. subtraction cutting is a technique that works better with practise and so I will like to develop this technique.
Thursday, 2 December 2010
The Making...
 |
| 2 metres of each fabric. |
 |
| pin and sew these together to create 'pillow case'. |
 |
| creating the pattern. |
 |
| darts on the back and front of the bodice will be at the top because of the positive and negative space. |
 |
| finished pattern. |
 |
| place pattern on pillow case to create subtraction. drew from one underarm to the other. |
 |
| what the shapes looks like. |
 |
| what it looks like so far. |
 |
| we used same pattern to use for the lining. the lining is short so that you wont be able to see if through the chiffon. |
 |
| placing the tunnels. |
 |
| matched them up and sew together. |
 |
| we then over locked the tunnels to prevent the chiffon from fraying. |
 |
| this is what the dress looked like after one tunnel at the top. we have used an invisible zip on the side of the dress. |
 |
| sewing the lining together. |
 |
| hand up to shoulder seams, pinch and pull through and sew! |
 |
| ta da!!!!!! |
Final Design.
Toile.
Before we get started on the final manufacturing of our garment we made a toile first. We made it half size so that we could get it done sufficiently and quickly whilst being able to decide and experiment with the subtraction cutting as it can be different every time. We used to contrasting materials in the toile which i think worked really well together and I think it's a good idea to use at least three fabrics for the subtraction part of the dress and it creates volume, layers and exemplifies all our ideas perfectly.
 |
| This time we made the subtraction rounder, as last time we did straight lines and it was not successful. |
 |
| As we want to create a bra-shape we drew it onto the garment to create the best shape. |
 |
| here we are trying to see where the tunnels would work best. |
 |
| we like the idea of having one at the top of the garment and one near the bottom. |
 |
| We now have an idea and an understanding of how we are going to make our final garment. |
 |
| Designs developed from the toile. |
Designs.
Below are my design ideas for this project, starting from design from my research and then combining our ideas together from the other members of my groups designs.
Wednesday, 1 December 2010
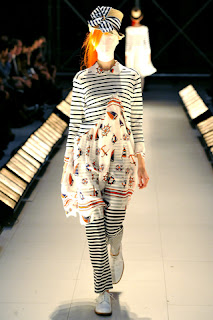
Junya Watanabe, Spring 2011 RTW
Junya Watanabe was one of the designers work that I loved the most at the '30 Years of Japanese Fashion' exhibition. His latest collection for spring 2011 involved stripes,pleats,sheerness, layers and movement:exactly how I would see my collection for this project being described.
Subscribe to:
Posts (Atom)


